Firstly, begin the setup process by adding essential information, such as your bank accounts, credit cards, and income and expense items. Afterward, you can input your income and expenses.
Selecting the right items for your household account is important. With KAKEIBO PRO and KAKEIBO LiGHT, you can customize items to suit your lifestyle and create a unique household account book. This guide explains how to set up bank accounts, credit cards, and income and expense items.
Language: English Japanese
1. Setting Bank Accounts
On this sheet, you will enter the bank accounts to manage in your household account. You can set up to thirty bank accounts. Follow these steps:
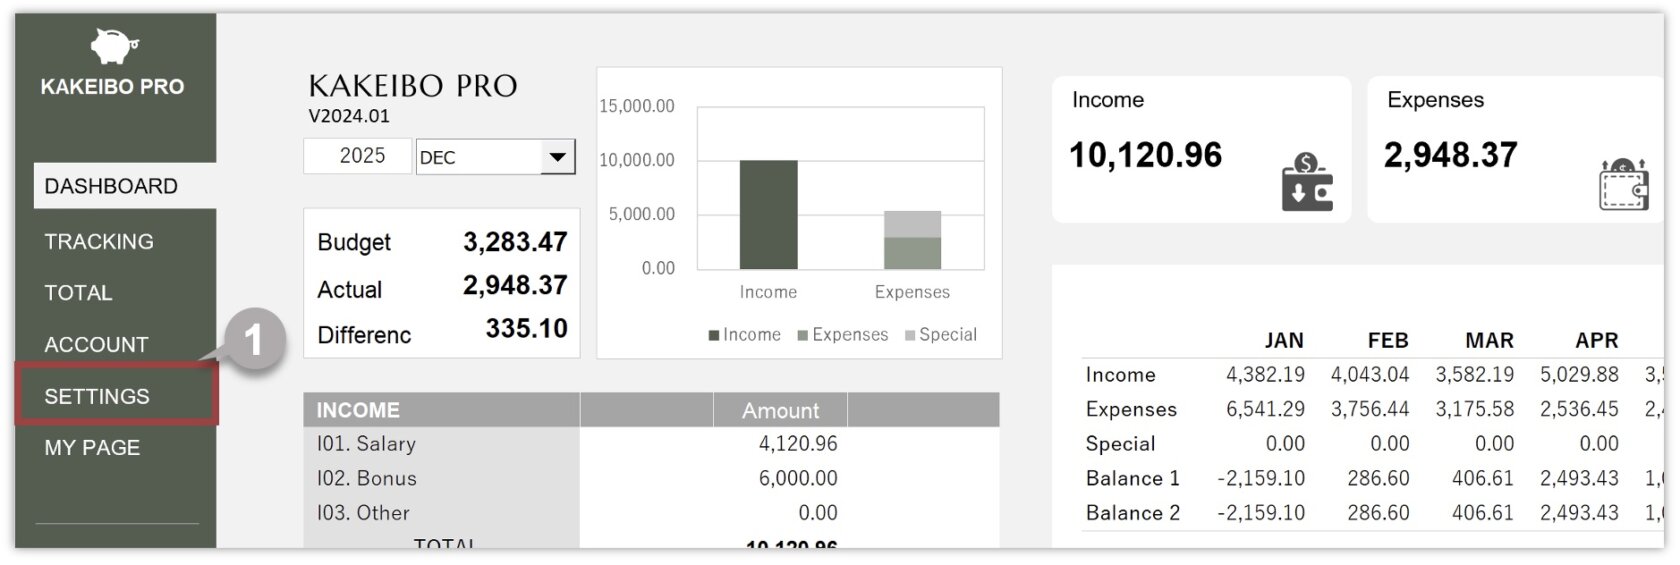
1 Click SETTINGS in the main menu, then select Bank Accounts under the SETTINGS group.
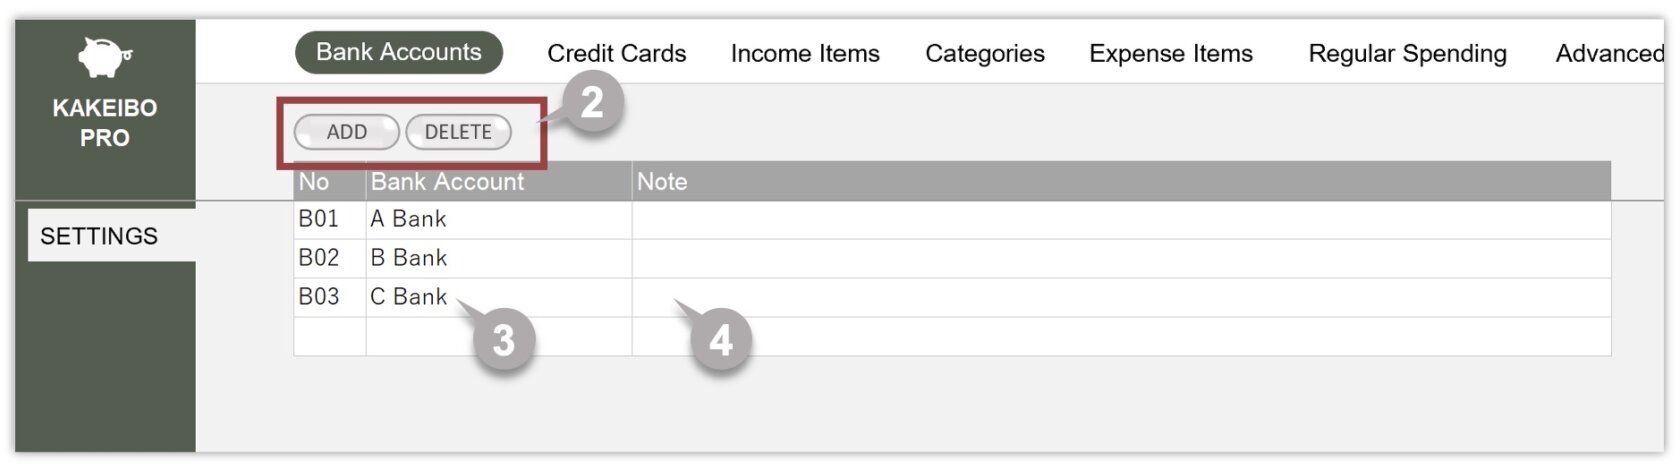
2 To add new data, click the ADD button. To delete the last entry, click the DELETE button. When the tool enters new data, an entry number is automatically allocated.
3 Enter the name of your bank account in the Bank Account column. 【 REQUIRED 】
4 Optionally, enter any notes in the Note column.
2. Setting Credit Cards
On this sheet, you will enter the credit cards to manage in your household account. You can set up to thirty credit cards. Follow these steps:
1 Click SETTINGS in the main menu, then select Credit Cards under the SETTINGS group.
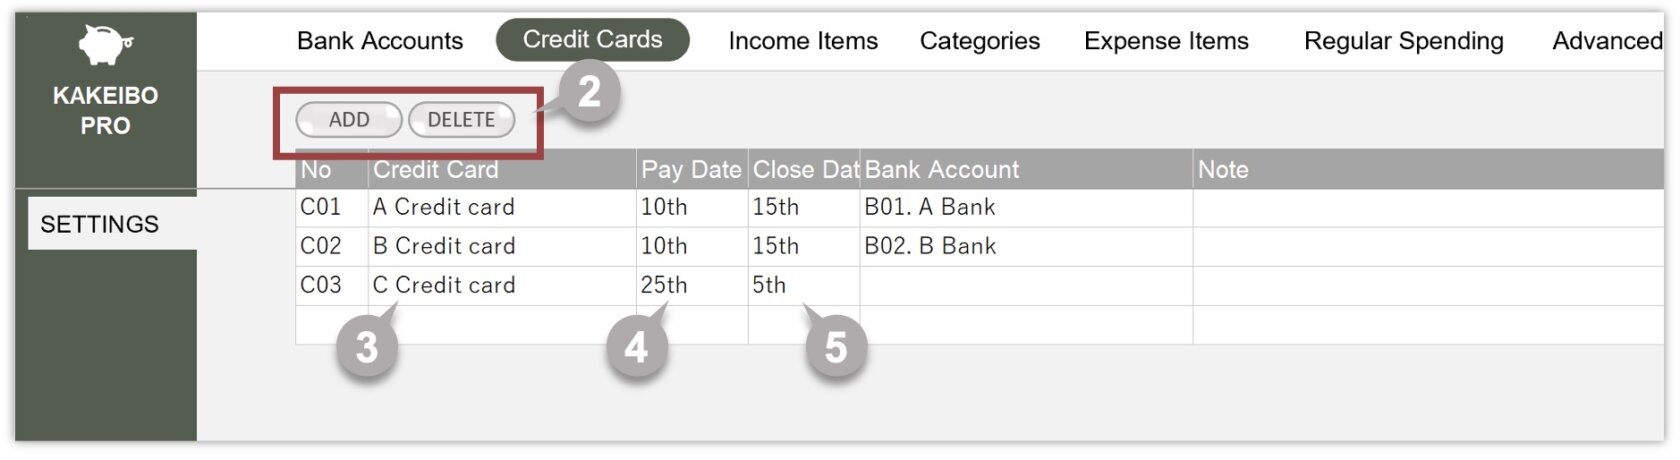
2 To add new data, click the ADD button. To delete the last entry, click the DELETE button. When the tool enters new data, an entry number is automatically allocated.
3 Enter the name of your Credit Card in the Credit Card column. 【 REQUIRED 】
4 Enter the settlement date in the Pay Date column.
5 Enter the cutoff date of billing in the Close Date column.
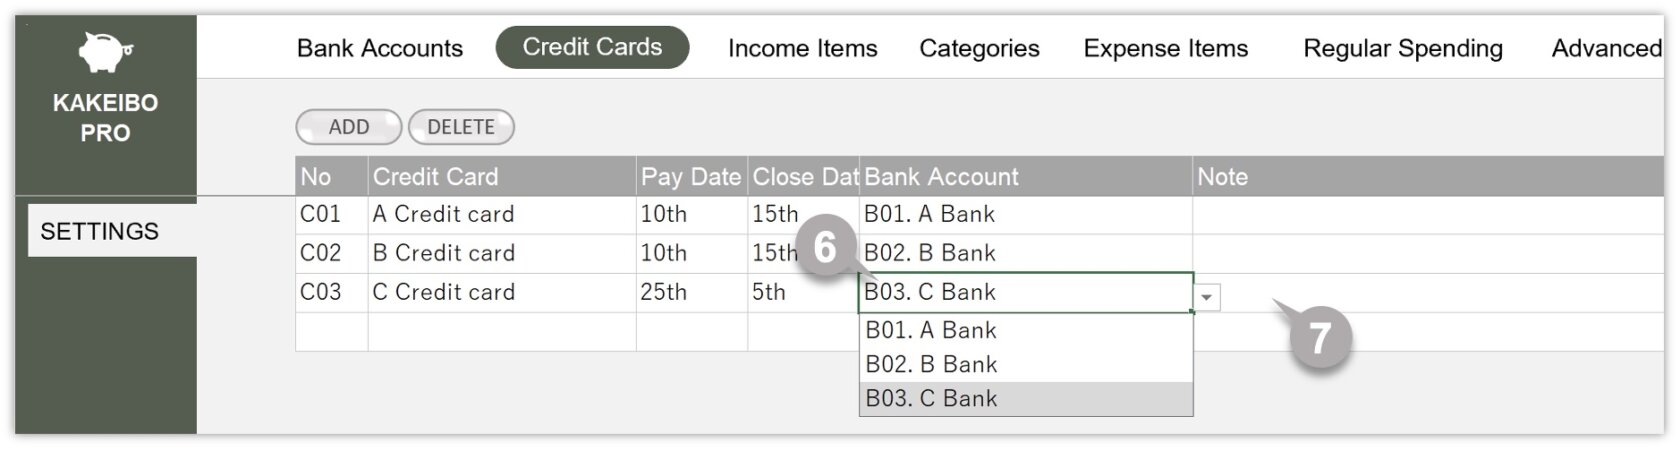
6 Select the relevant bank account from the drop-down list in the Bank Account column to allocate your credit card. 【 REQUIRED 】
7 Optionally, enter any notes in the Note column.
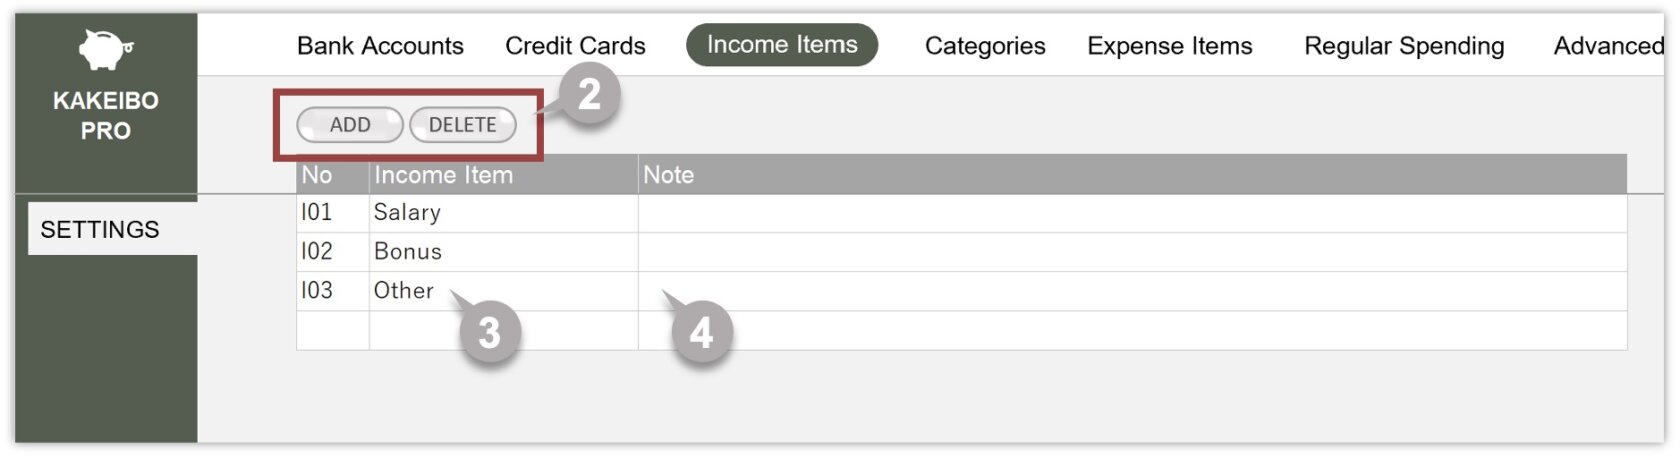
3. Setting Income Items
On this sheet, you will enter the income items to manage in your household account. You can set up to thirty income items. Follow these steps:
1 Click SETTINGS in the main menu, then select Income Items under the SETTINGS group.
2 To add new data, click the ADD button. To delete the last entry, click the DELETE button. When the tool enters new data, an entry number is automatically allocated.
3 Enter the name of your income item in the Income Item column. 【 REQUIRED 】
4 Optionally, enter any notes in the Note column.
4. Setting Categories
The tool manages expense items by dividing them into categories. Set up your categories for FIXED, VARIABLE, and BUSINESS. Enter expenses that occur every month, such as housing and utilities, under FIXED, and expenses that occur occasionally, such as food and transportation, under VARIABLE. You can set up to thirty expense categories. Follow these steps:
1 Click SETTINGS in the main menu, then select Categories under the SETTINGS group.
2 To add new data, select the option (Fixed, Variable, or Business) and click the ADD button. To delete the last entry, click the DELETE button. When the tool enters new data, an entry number is automatically allocated.
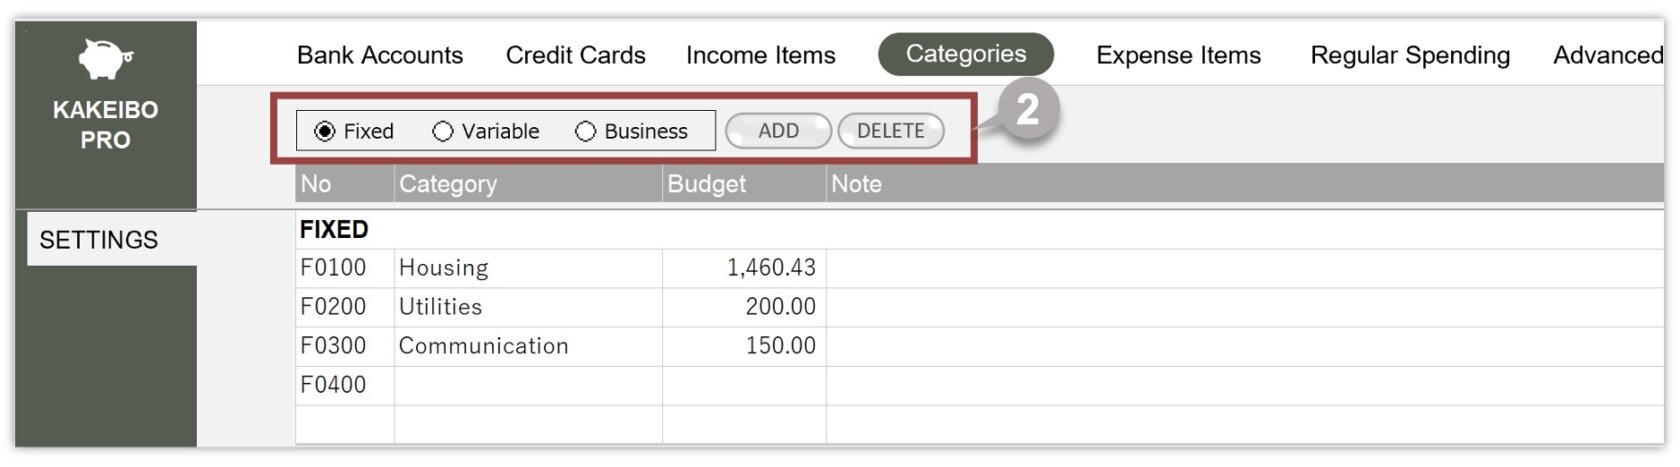
3 Enter the expense category in the Category column. 【 REQUIRED 】
4 Enter the monthly budget amount in the Budget column. 【 REQUIRED 】
5 Optionally, enter any notes in the Note column.
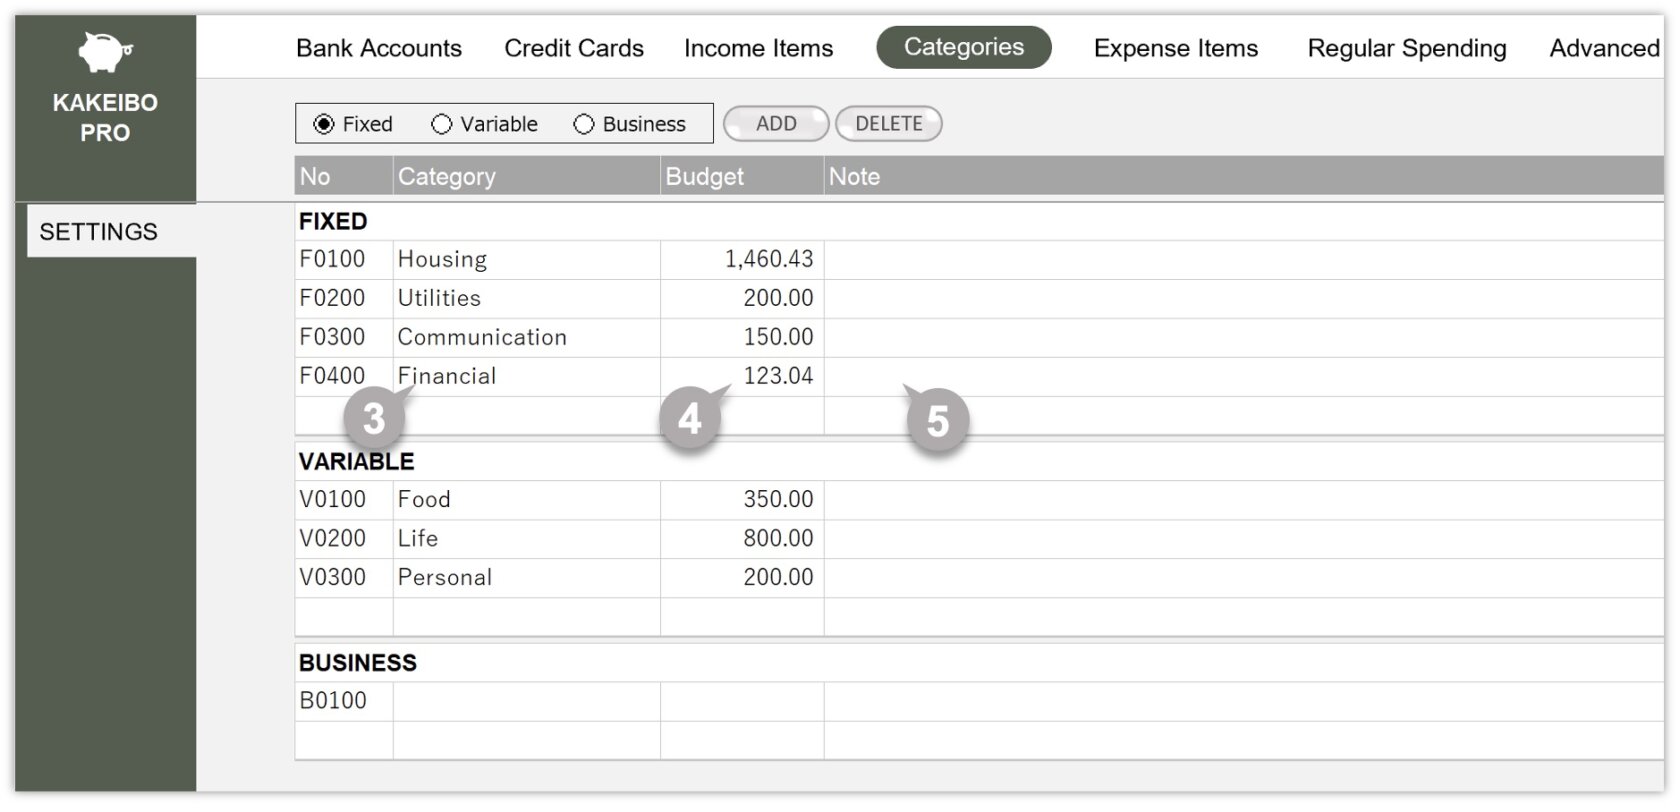
BUSINESS
If you have a personal business or a side job, you will likely incur business-related expenses. This tool provides a category called BUSINESS for such expenses. You can enter business-related expenses into the BUSINESS category, allowing you to manage your personal and business expenses separately.

5. Setting Expense Items
On this sheet, you will enter expense items by category to manage them in your household account. You can set up to thirty expense items in each category. Follow these steps:
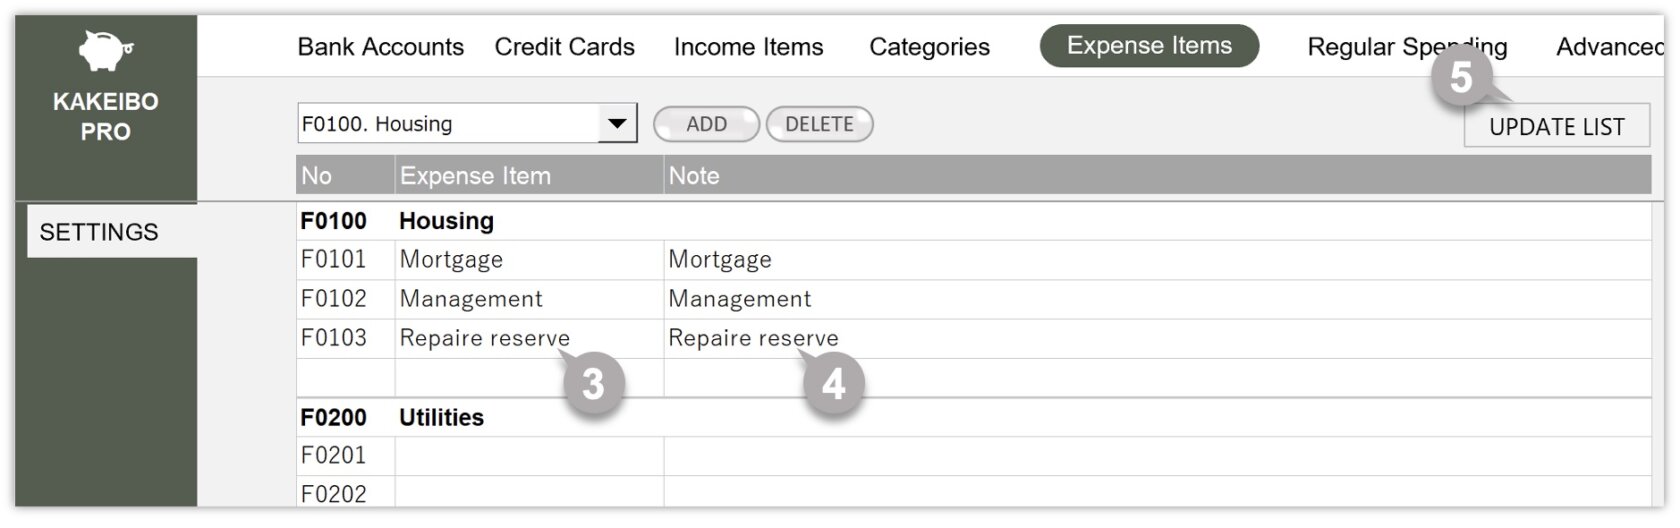
1 Click SETTINGS in the main menu, then select Expense Items under the SETTINGS group.
2 To add new data, select the relevant category from the drop-down list and click the ADD button. To delete the last entry, click the DELETE button. When the tool enters new data, an entry number is automatically allocated.
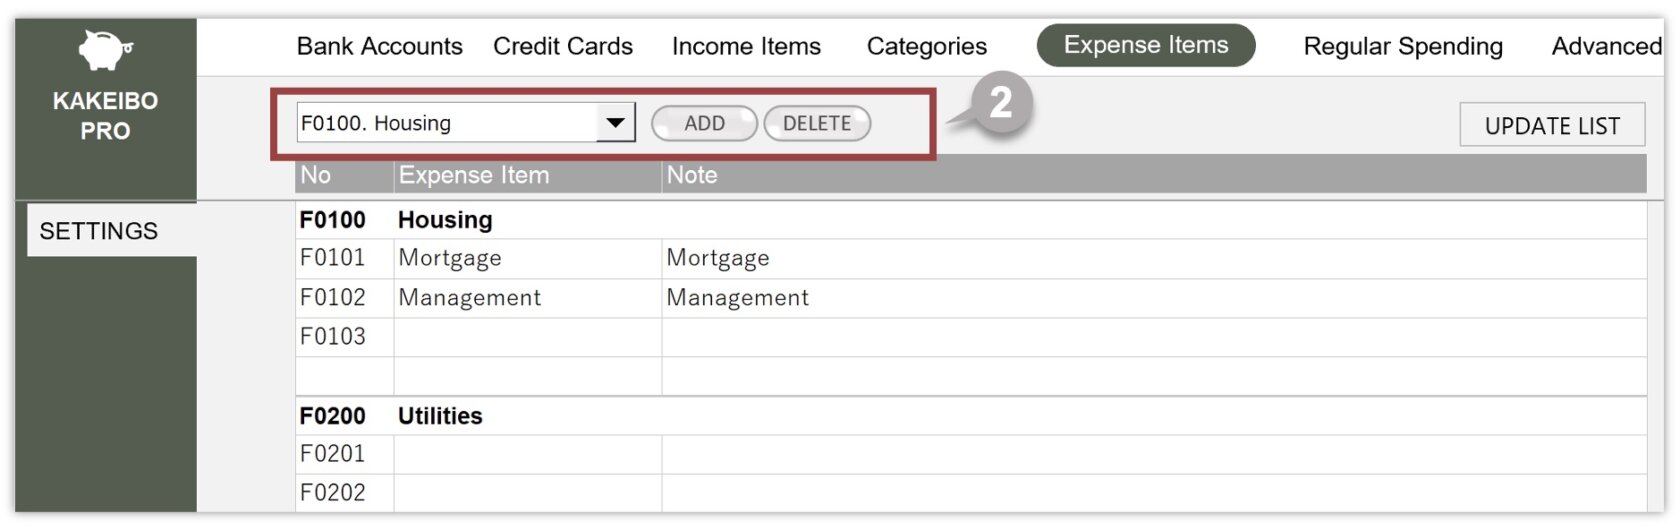
3 Enter the expense item in the Expense Item column. 【 REQUIRED 】
4 Optionally, enter any notes in the Note column.
5 After completing data entry, click UPDATE LIST in the upper-right corner of the list. This action will update the list of expense items, and the display will change to LATEST.
Notes for Setting Items
If you initially set an item as “Miscellaneous & Daily Supplies” and rename it to “Daily Supplies” at some point, there is no issue, as the items are similar.
However, if you change “Miscellaneous & Daily Supplies” to “Transportation,” the totals will not be accurate. The monthly and annual tables tabulate income and expense data based on codes (alphanumeric characters prefixed to the item name). If you change “V0202” to “Transportation” at some point, like “V0202. Miscellaneous & Daily Supplies → V0202. Transportation,” the tool will tally the items you previously entered under Miscellaneous & Daily Supplies as Transportation.

6. Setting Regular Spending
Knowing how much you spend on regular payments each month can help you create a budget. On this sheet, you will enter expenses that you pay regularly, such as utility bills and monthly dues.
The tool automatically enters the expense items categorized as FIXED (Area F). If you have expense items categorized as VARIABLE or BUSINESS and paid on a regular basis, you will input them in the Subscriptions section (Area S). Follow these steps:

1 Click SETTINGS in the main menu, then select Regular Spending under the SETTINGS group.
FIXED
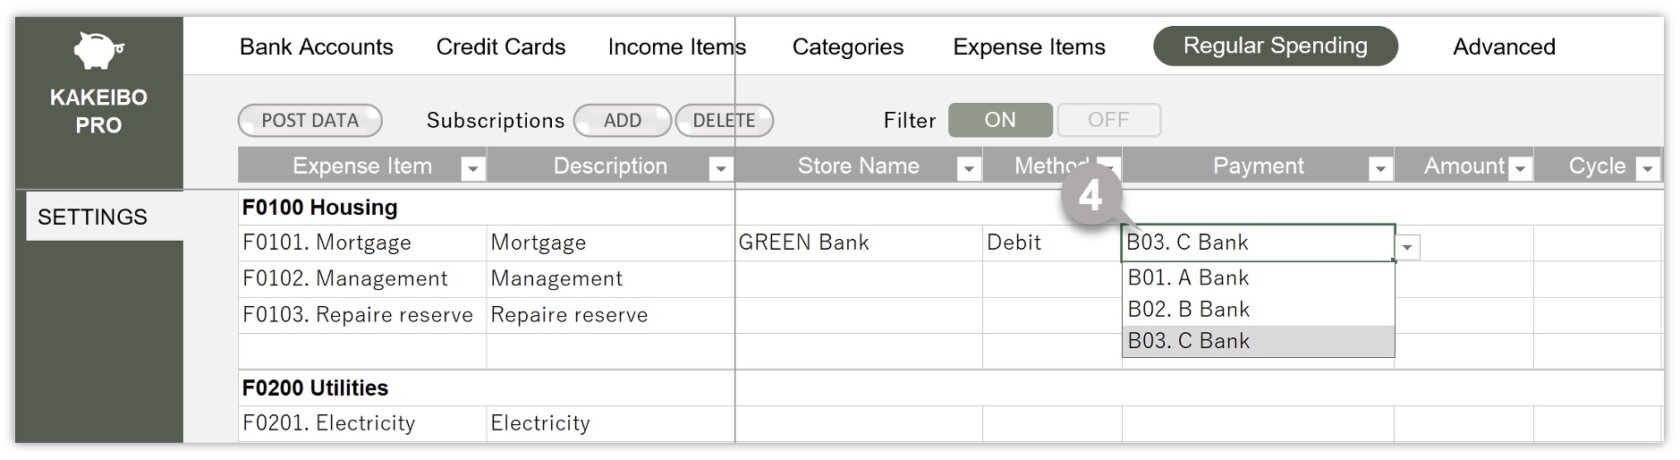
2 Enter the store or payee in the Store Name column.
3 Select the method for the payment from the drop-down list in the Method column.

4 If you select “Debit” as the payment method, the list of bank accounts will appear in the Payment column. If you select “Credit“, the list of credit cards will appear. Choose the relevant option from the drop-down list. If you select “Other“, manually enter the payment method, such as a prepaid e-money card.
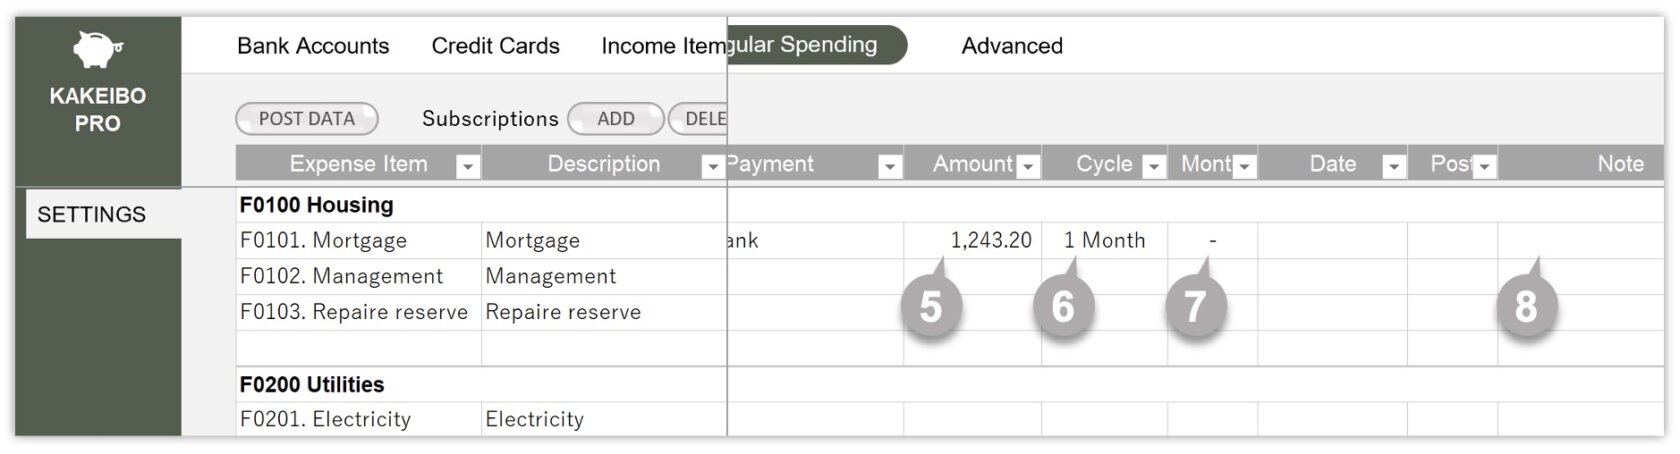
5 Enter the payment amount in the Amount column.
6 Select the relevant cycle from the drop-down list in the Cycle column.
7 Select the relevant month from the drop-down list in the Month column. If the cycle is monthly, select “–“.
8 Optionally, enter any notes in the Note column.
FIXED
The expense items you entered in the Expense Items sheet will be automatically displayed in the Expense Item column and the Description column. These entries cannot be modified by the user.
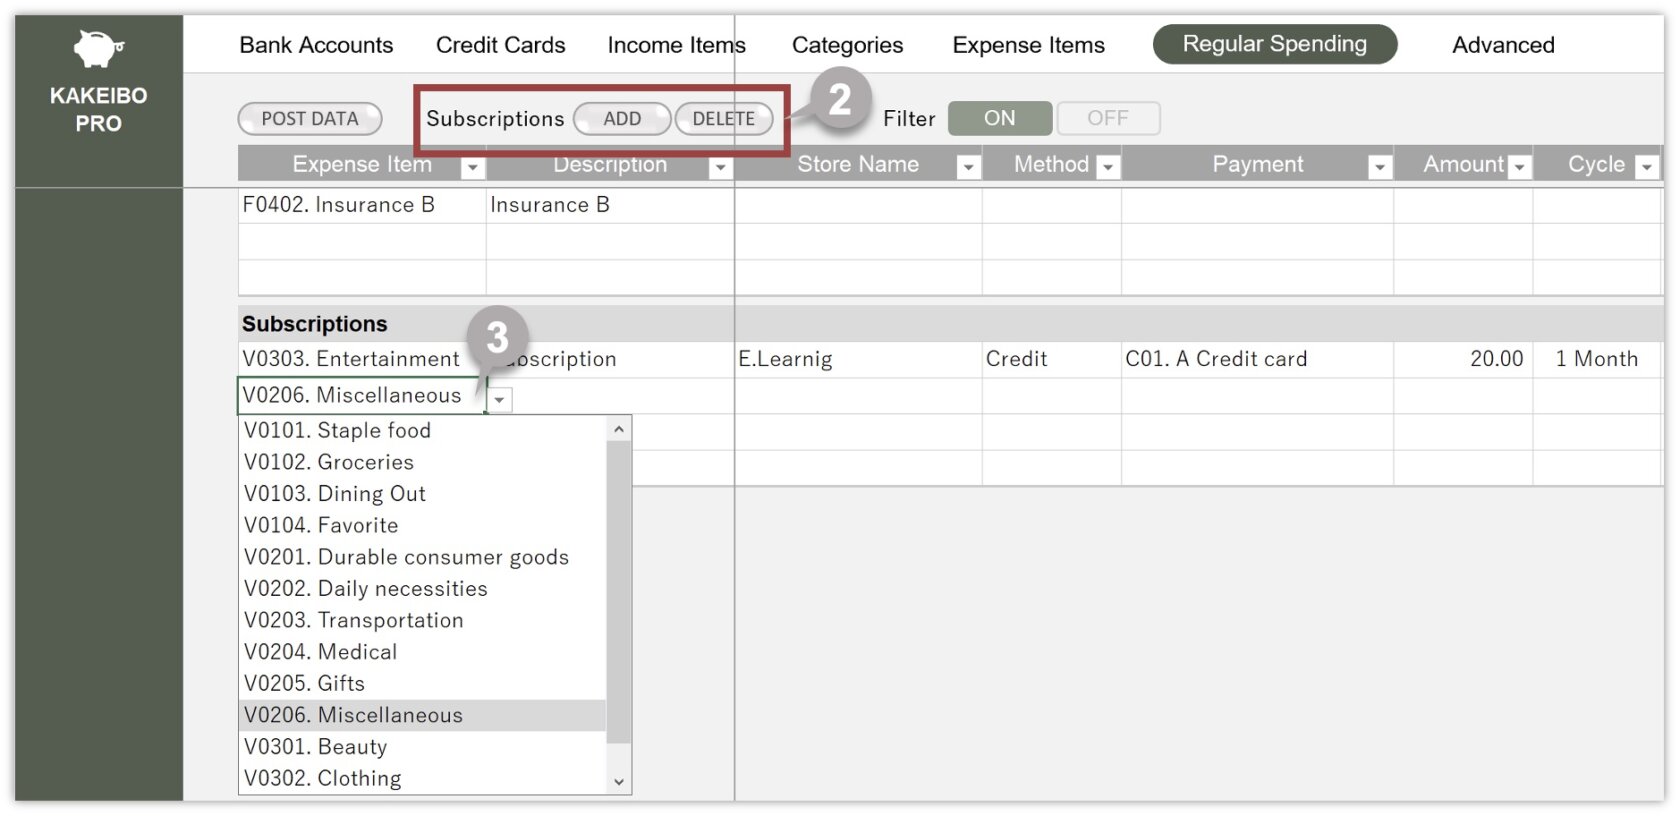
Subscriptions
2 To add new data, click the ADD button. To delete the last entry, click the DELETE button.
3 Select the relevant expense item from the drop-down list in the Expense Item column. 【 REQUIRED 】
4 Enter the details of the expense in the Description column.
5 Enter the store or payee in the Store Name column.
6 Select the method for the payment from the drop-down list in the Method column.
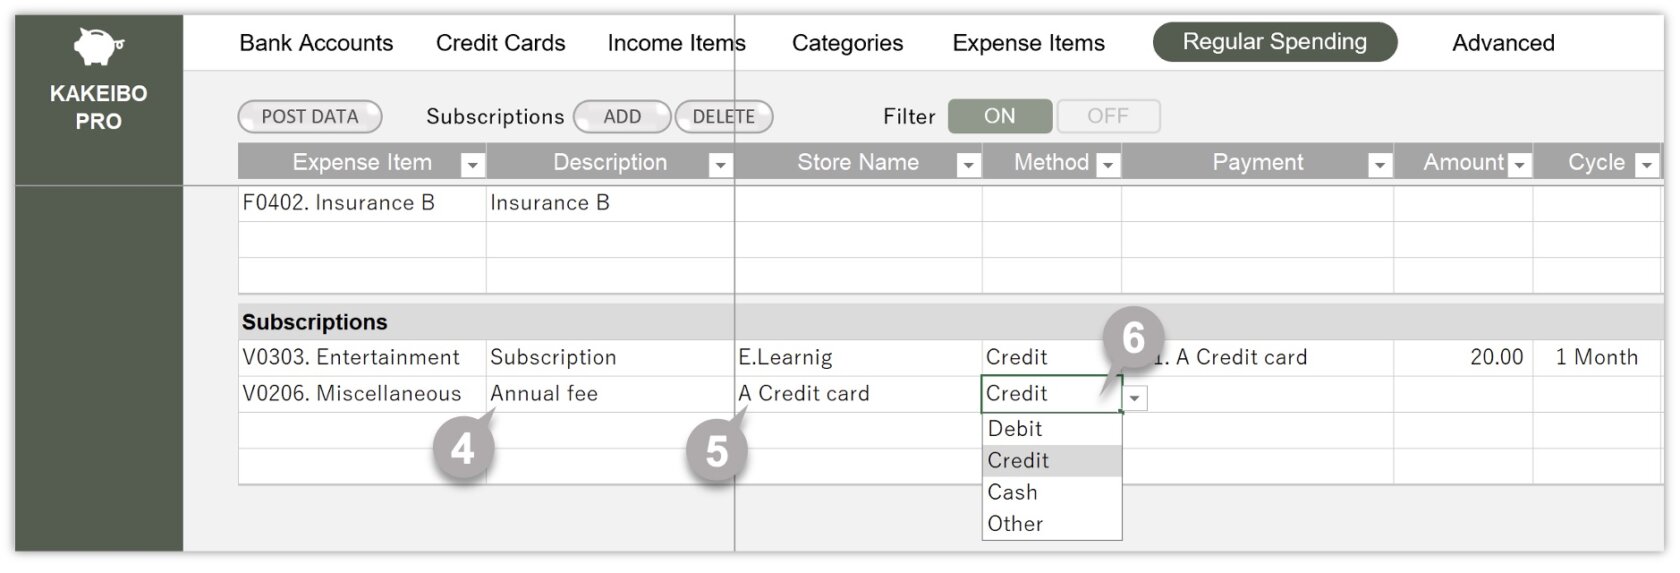
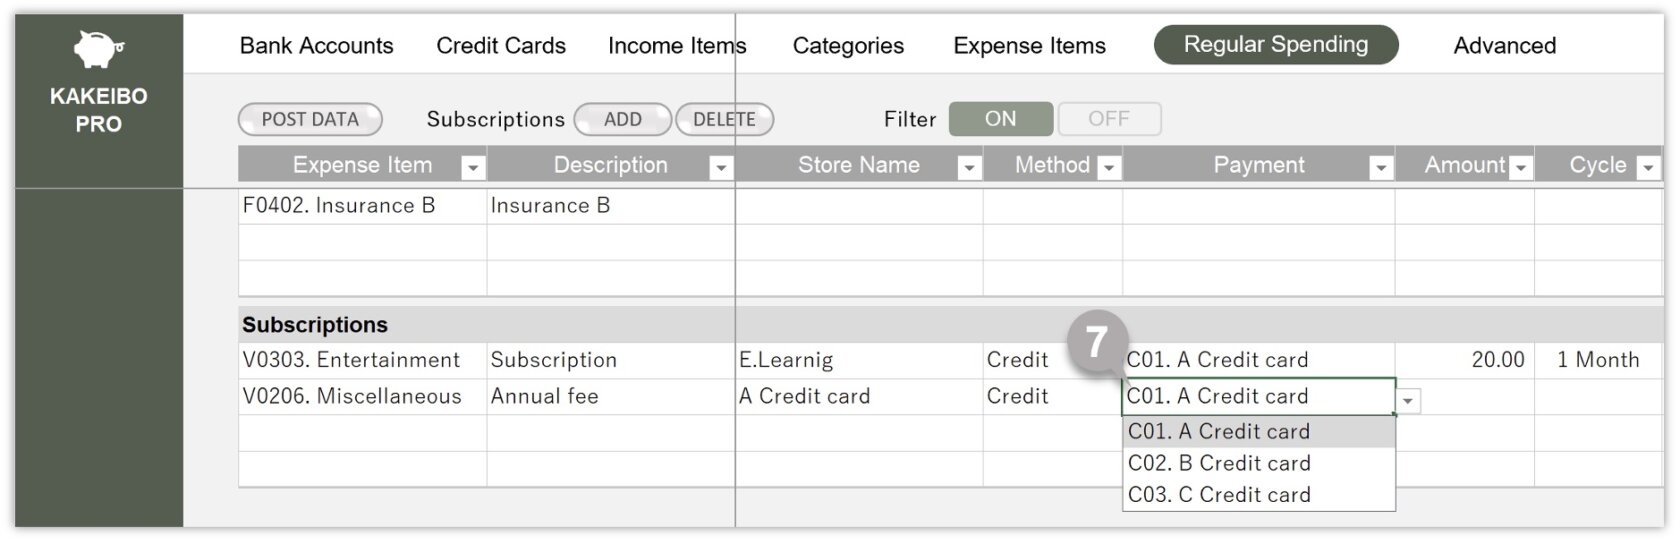
7 If you select “Debit” as the payment method, the list of bank accounts will appear in the Payment column. If you select “Credit“, the list of credit cards will appear. Choose the relevant option from the drop-down list. If you select “Other“, manually enter the payment method, such as a prepaid e-money card.
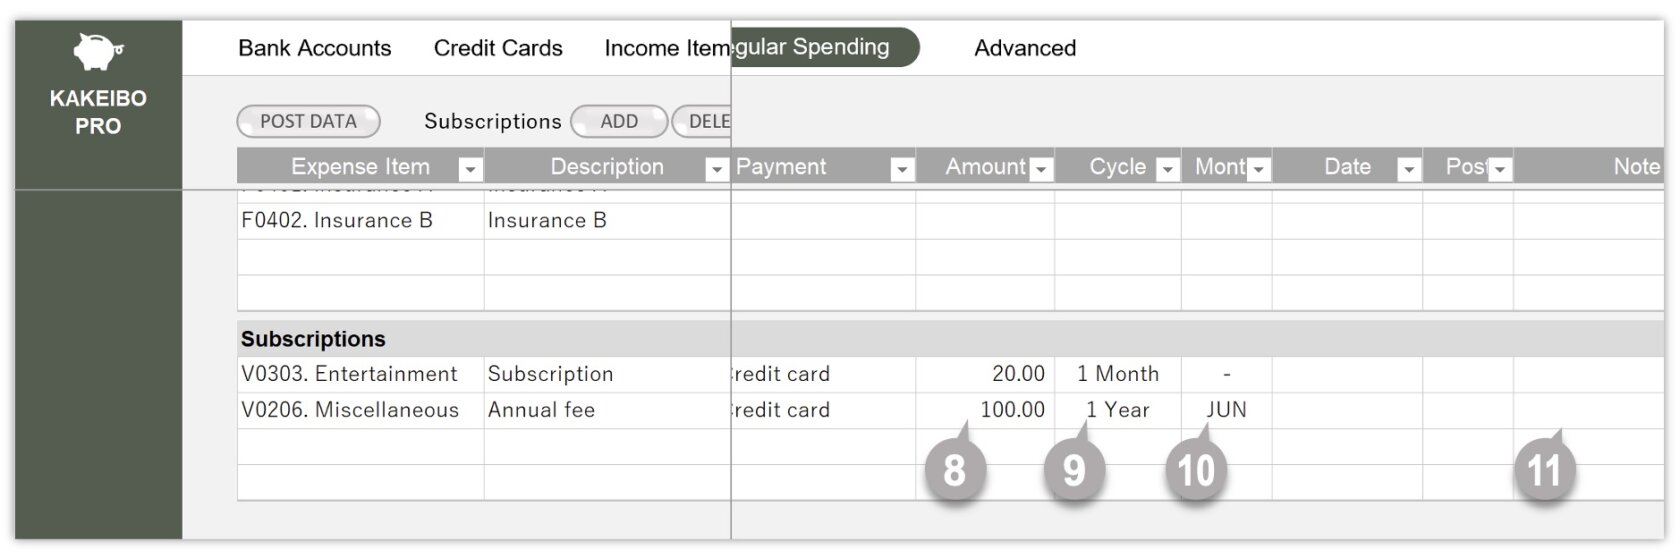
8 Enter the payment amount in the Amount column.
9 Select the relevant cycle from the drop-down list in the Cycle column.
10 Select the relevant month from the drop-down list in the Month column. If the cycle is monthly, select “–“.
11 Optionally, enter any notes in the Note column.
Useful Features
You can automatically post data entered on the Regular Spending sheet to the Expenses sheet. You can find instructions on how to post data in the following article.

CONTENTS