KAKEIBO SLiM is a macro-free Excel-based household accounting tool. It boasts a simple design, focusing on three core functions: Dashboard, Income/Expense Input, and Settings. No complex operations are required, allowing you to start managing your finances instantly.
Daily expenses are entered manually, but tedious calculations are automated. You can quickly grasp your monthly balance and expense breakdown by item on the dashboard. Customization is flexible, allowing you to add rows and tailor the spreadsheet to your specific needs.
Ideal for those who want to begin managing their household finances with a simple, uncluttered tool, KAKEIBO SLiM offers an easy and efficient way to track your spending. This guide provides instructions on how to use KAKEIBO SLiM.
Language: English Japanese
1. Download File
After completing the purchase process from the online store, you can download the file. Please save the file in an appropriate location after downloading. You can rename the file without any issues.
2. Features and Operation
KAKIEBO SLiM has the following three core functions:
Dashboard
Income / Expense Input
Settings
DASHBOARD
You can navigate to the target sheet by clicking the menu on the sidebar. Alternatively, you can switch sheets by clicking a sheet tab.
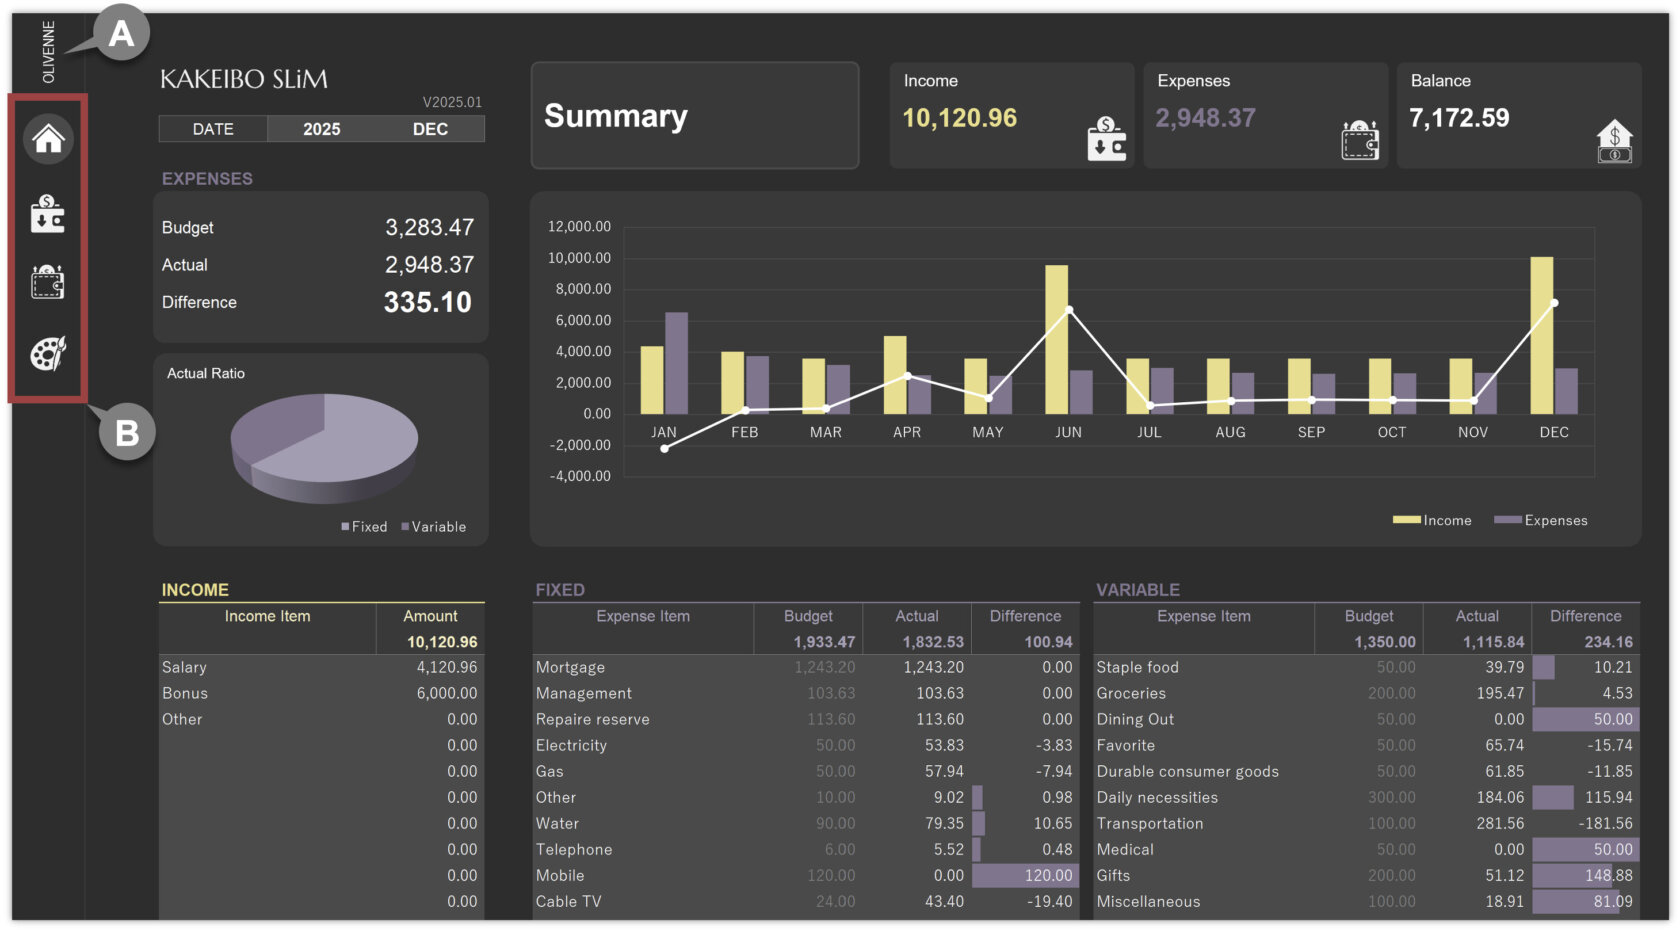
A Open the OLIVENNE site: olivenne.com
B Menu: Home, Income Data, Expense Data, Settings
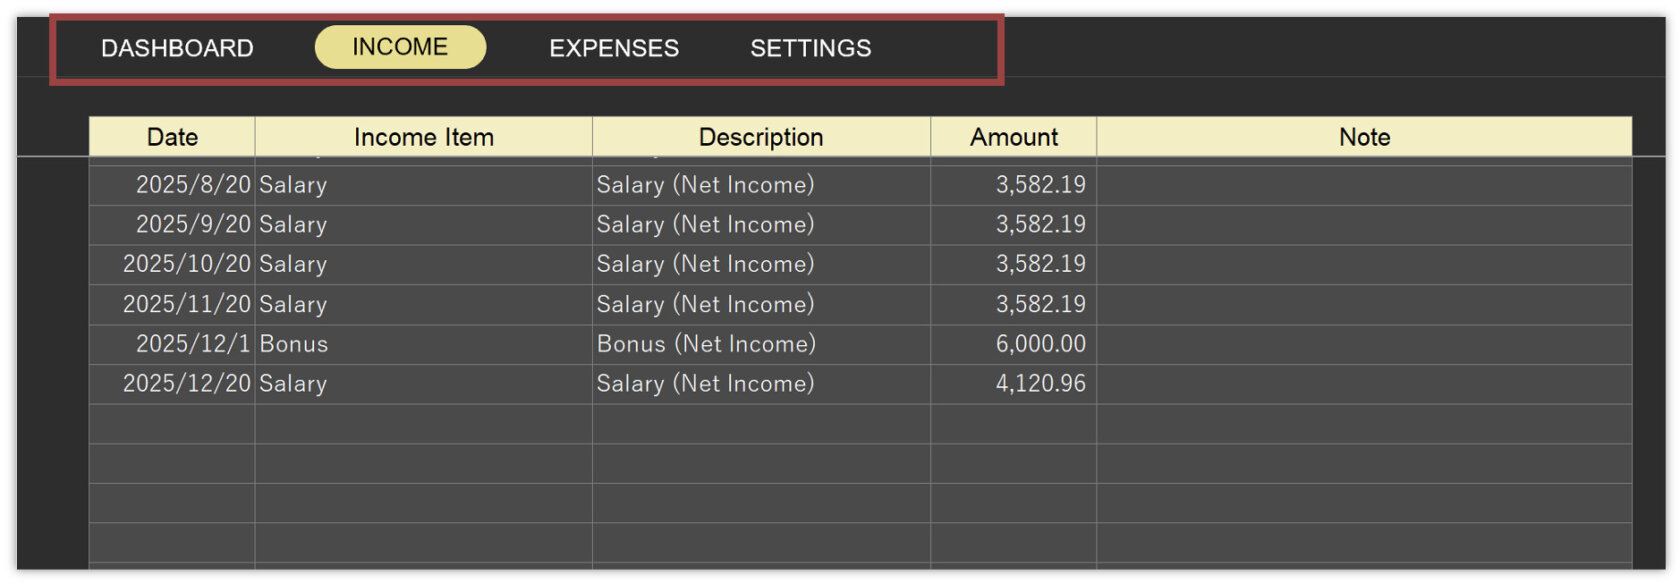
INCOME / EXPENSES
You can navigate to the target sheet by clicking the menu in the header. Alternatively, you can switch sheets by clicking a sheet tab.
SETTINGS
You can navigate to the target sheet by clicking the menu in the header. Alternatively, you can switch setting sheets by clicking a sheet tab.
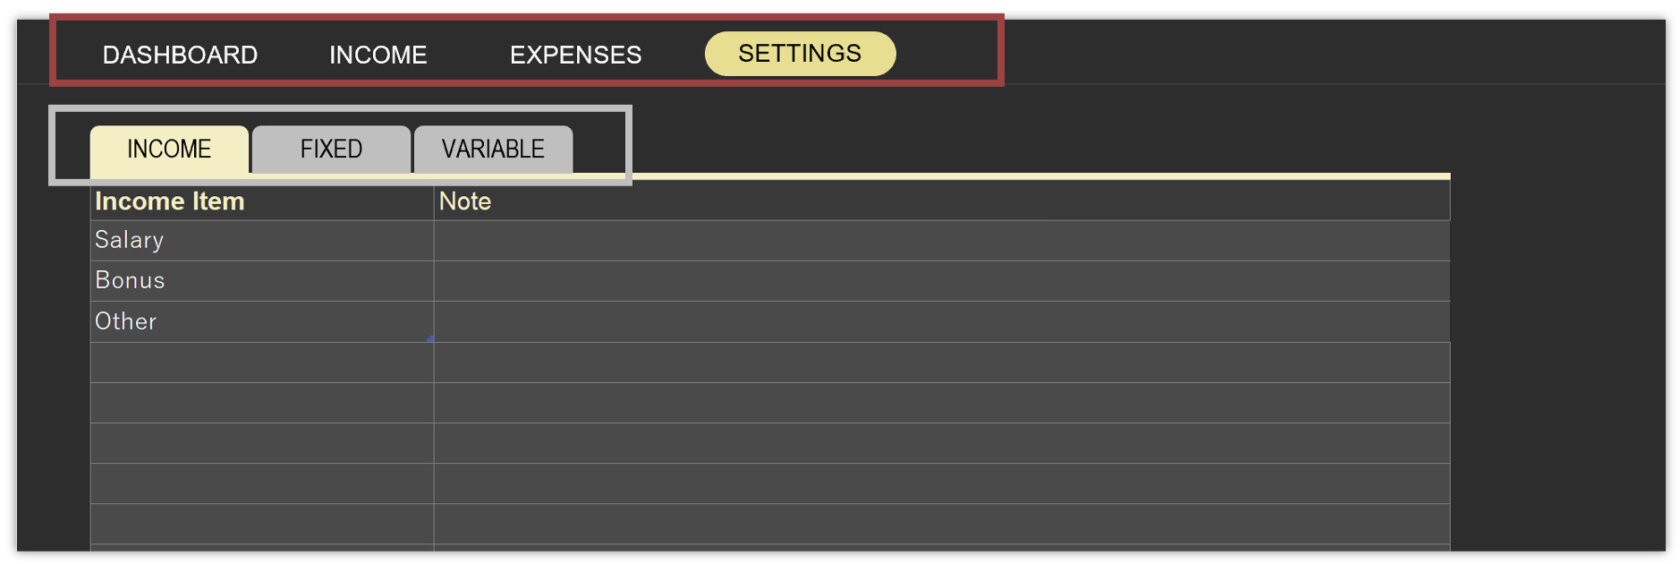
3. Setting Items for Income and Expenses
On the Settings sheet, you will enter the income and expense items to manage in your household account. The tool categorizes expense items as FIXED or VARIABLE for better management.
3-1 Setting Items for Income
Follow these steps to set items for income:
1 Navigate to the INCOME setting sheet.
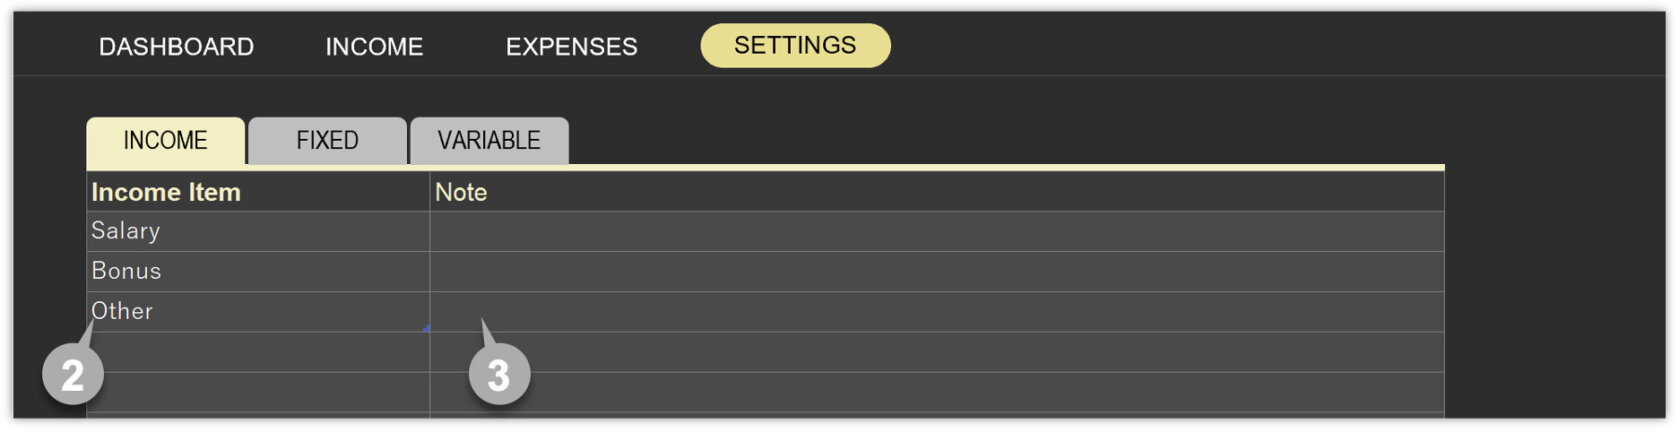
2 Enter the name of your income item in the Income Item column. 【 REQUIRED 】
3 Optionally, enter any notes in the Note column.
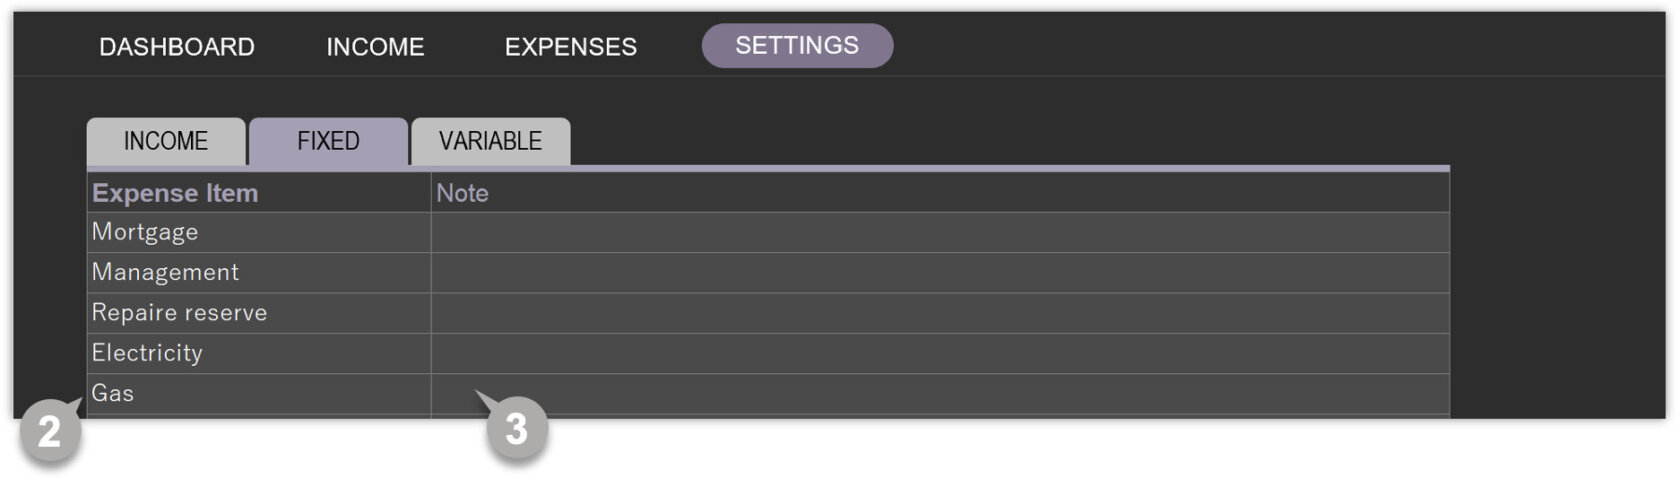
3-2 Setting Items for Fixed Expenses
Enter expenses that occur every month, such as housing and utilities, into the FIXED sheet. Follow these steps to set items for expenses:
1 Navigate to the FIXED setting sheet for expenses.
2 Enter the name of your expense item in the Expense Item column. 【 REQUIRED 】
3 Optionally, enter any notes in the Note column.
3-3 Setting Items for Variable Expenses
Enter expenses that occur occasionally, such as food and transportation, into the VARIABLE sheet. Follow these steps to set items for expenses:
1 Navigate to the VARIABLE setting sheet for expenses.
2 Enter the name of your expense item in the Expense Item column. 【 REQUIRED 】
3 Optionally, enter any notes in the Note column.

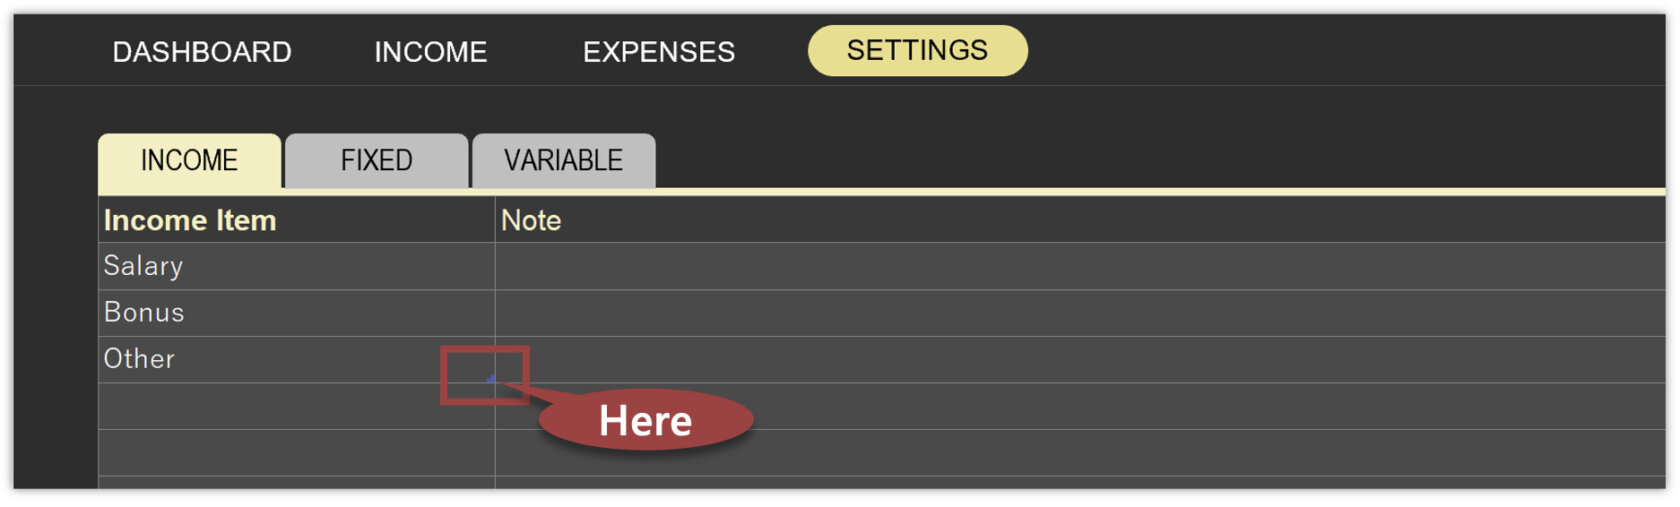
3-4 Adjustment for Data Range
When entering data in the INCOME or EXPENSES sheet, the list of items set in the SETTINGS sheet will appear. A blue dot in the item column indicates the data range. When you add new data, the data range adjusts automatically. However, when you delete data, the data range does not adjust automatically. In this case, you need to manually adjust the range by dragging the blue dot.
4. Tracking Income and Expenses
You will enter daily income and expenses manually. Enter income details on the INCOME sheet and daily expenditure details on the EXPENSES sheet.
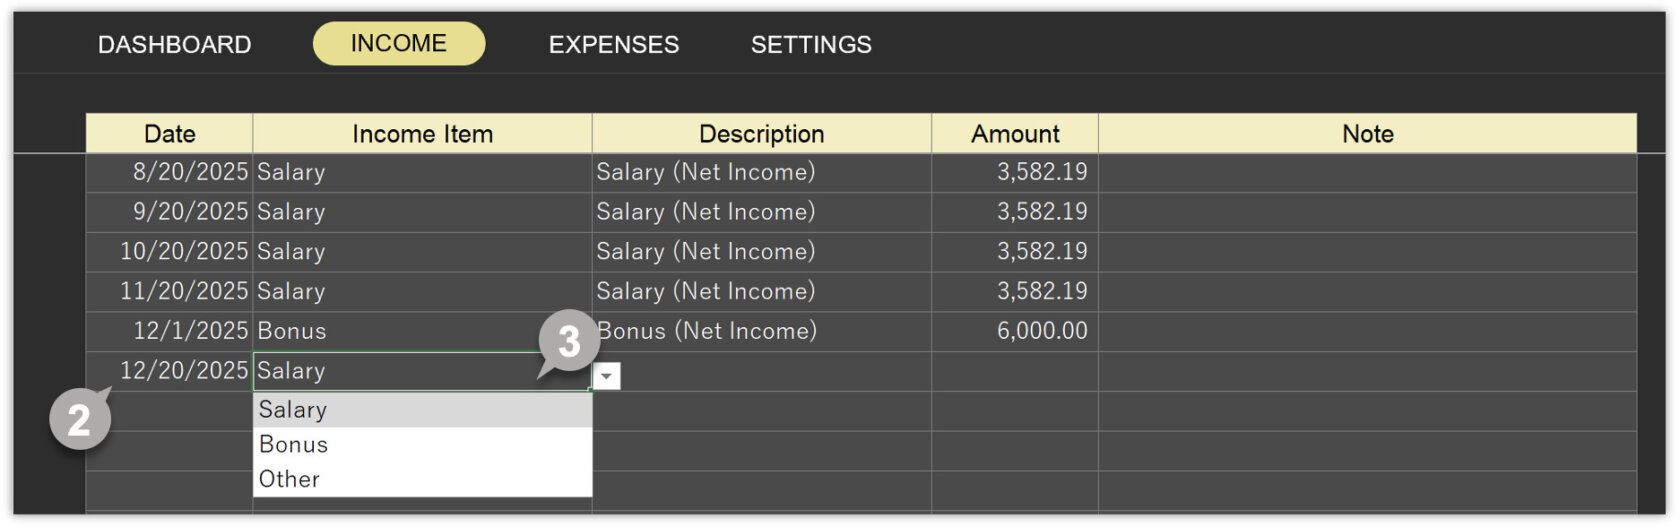
4-1 Entering Income Data
Follow these steps to enter income details:
1 Navigate to the INCOME sheet.
2 Enter the deposit date in the Date column. 【 REQUIRED 】
3 Select the relevant income item from the drop-down list in the Income Item column. 【 REQUIRED 】
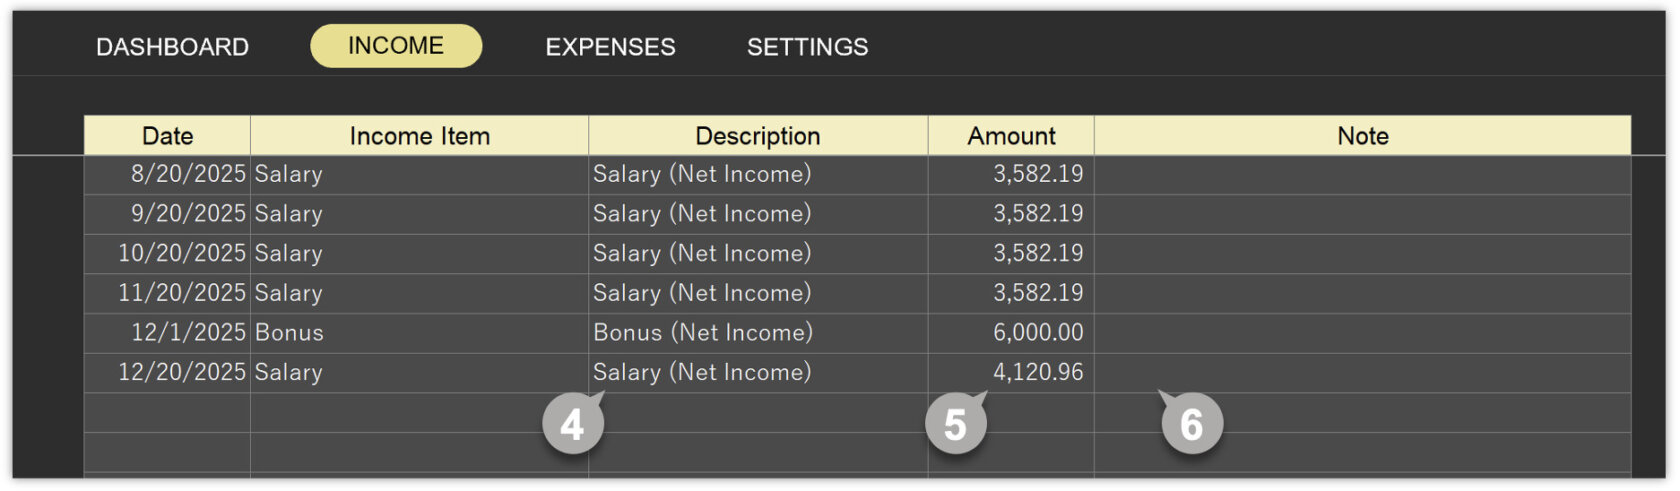
4 Enter the description of the income in the Description column.
5 Enter the income amount in the Amount column. 【 REQUIRED 】
6 Optionally, enter any notes in the Note column.
4-2 Entering Expense Data
Follow these steps to enter expense details:
1 Navigate to the EXPENSES sheet.
2 Enter the purchase date in the Date column. 【 REQUIRED 】
3 Choose “FIXED” or “VARIABLE” from the drop-down list in the Type column. 【 REQUIRED 】
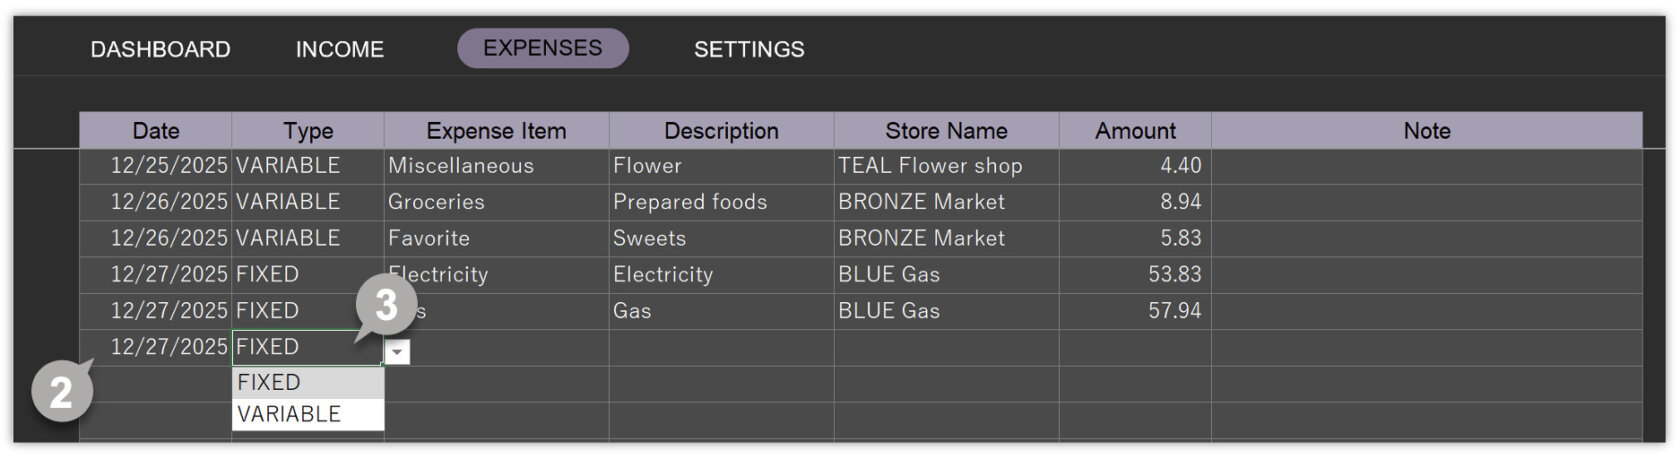
4 If you choose “FIXED” as the type, a list of fixed expense items will appear. If you choose “VARIABLE” as the type, a list of variable expense items will appear. Select the relevant option from the drop-down list. 【 REQUIRED 】
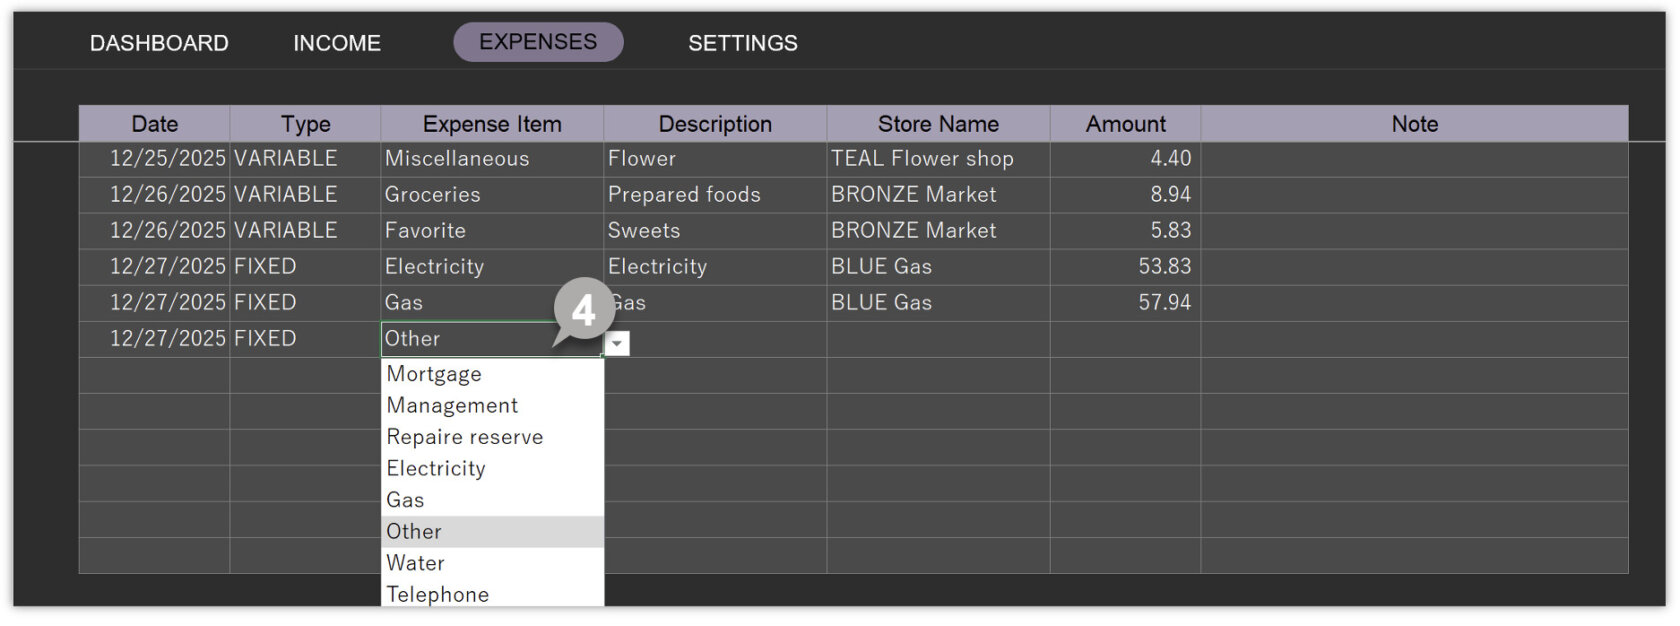
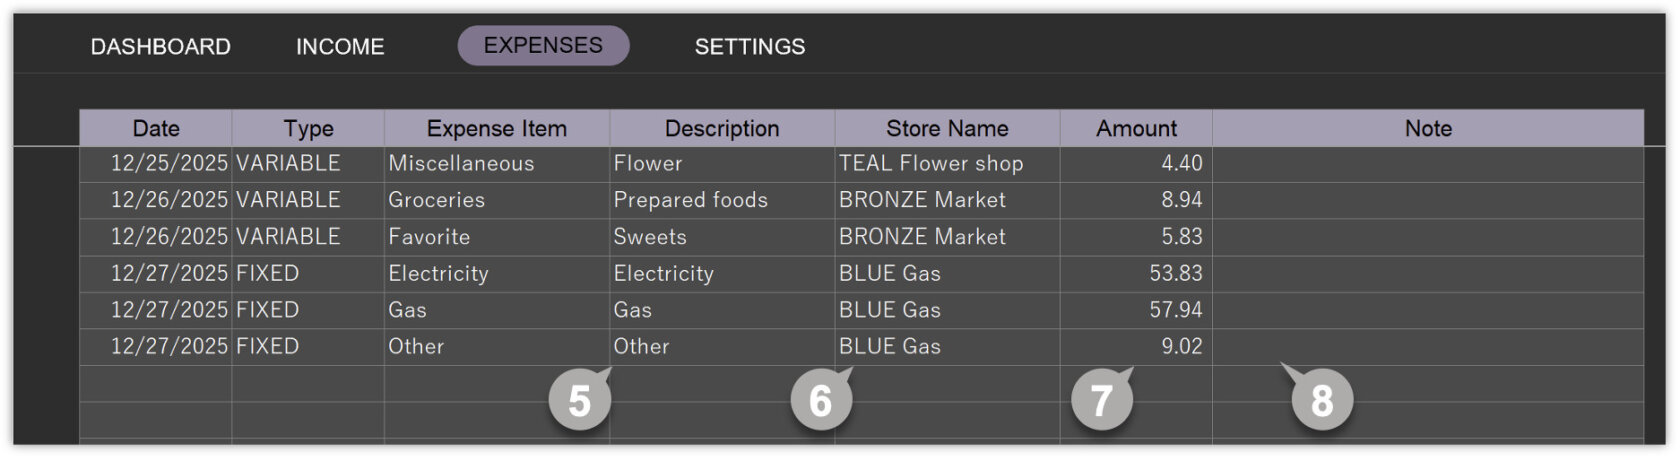
5 Enter the details, such as purchased items, in the Description column.
6 Enter the store name or the payee in the Store Name column.
7 Enter the purchase amount in the Amount column.
8 Optionally, enter any notes in the Note column.
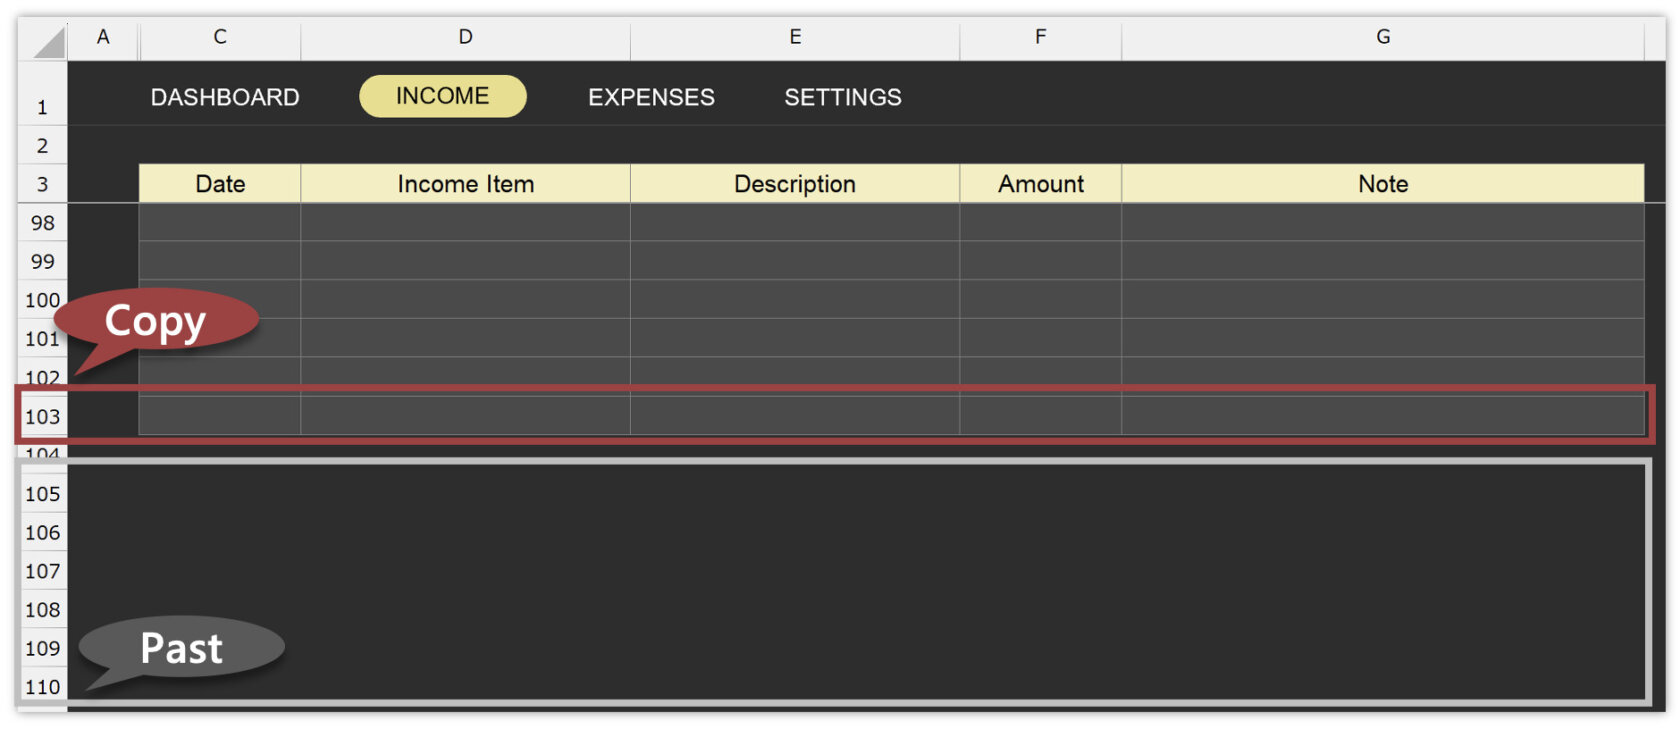
4-3 Adding Data
As a default, you can enter up to 100 data entries. If you need to add more, copy the last row and paste the required number of rows.
5. Dashboard
The tool displays your income, expenses, and balances in monthly and yearly tables and charts on the dashboard. The dashboard automatically calculates the data when you specify the year and month. You can monitor overspending by setting your budgets. Since all the information is displayed on one screen, you can get an overview of your household finances at a glance.
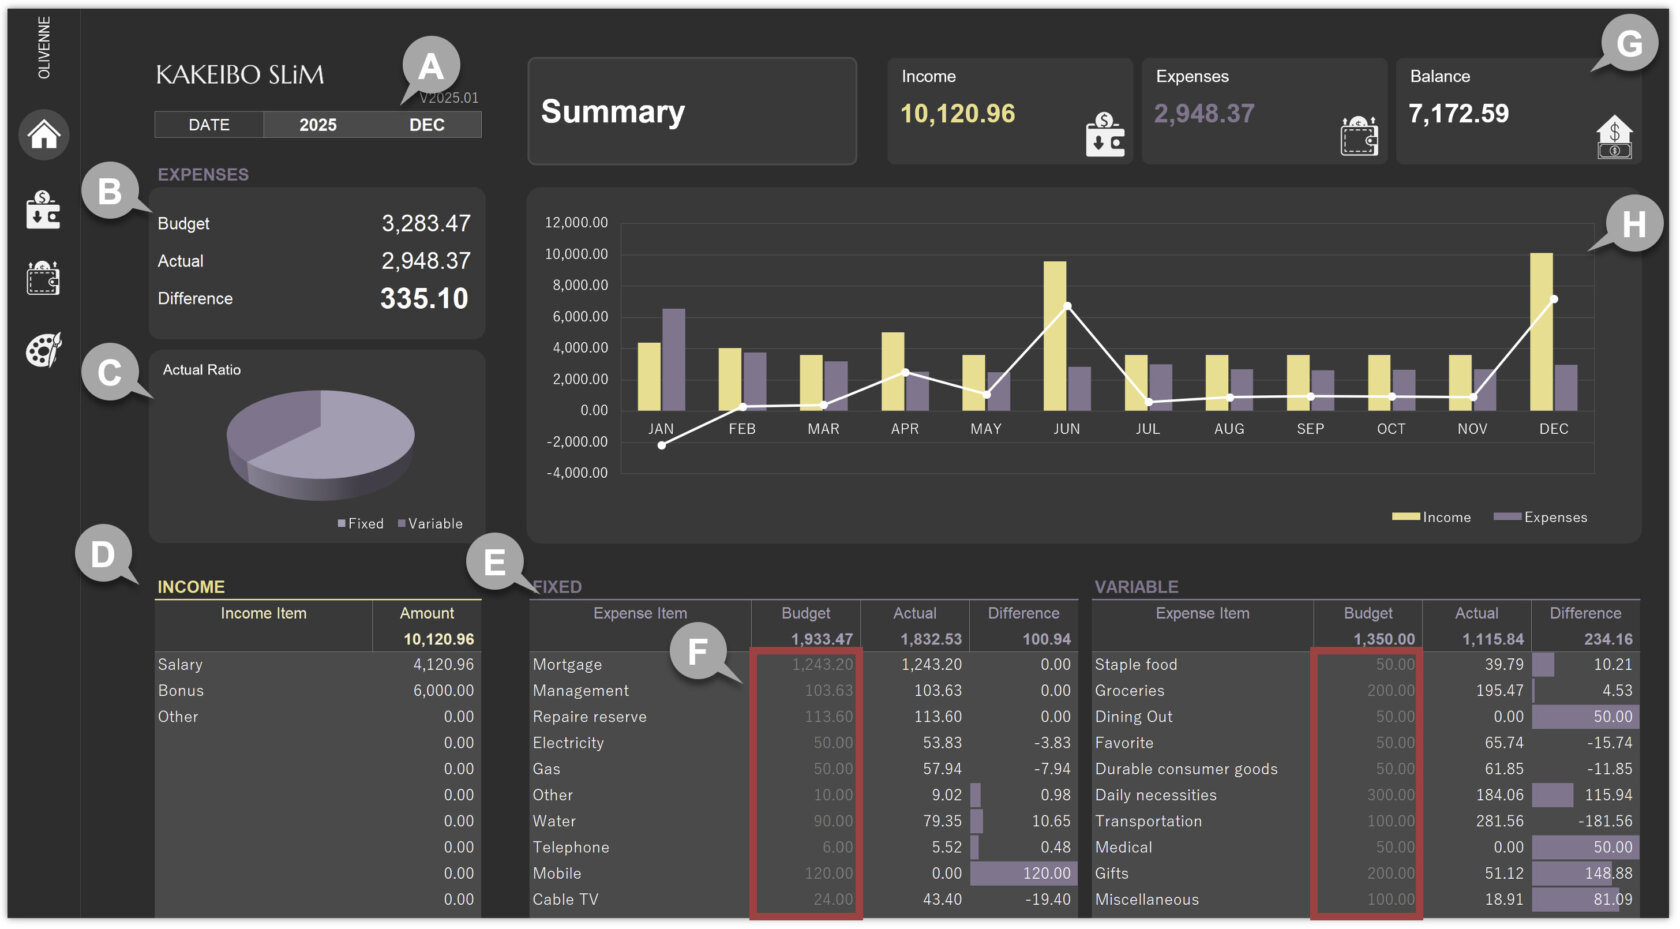
A Specify the Year and Month
Specify the target year and month. The dashboard will automatically calculate the data, allowing you to view the total values for the specified year and month in tables and charts.
B Budget vs. Actual Expenses
It displays the monthly totals for the budget, actual expenses, and the difference (budget – actual expenses) for the specified year and month. You can easily compare the set budget with actual expenses. Any deviation from the budget can be immediately noticed, allowing you to make necessary adjustments.
C Fixed vs. Variable
The proportion of fixed and variable components in actual expenses is depicted through charts. This visualization provides an immediate understanding of the ratio between fixed and variable expenses.
D Monthly Total of Income
It totals the income amount by item for the specified year and month.
E Monthly Total of Expenses and Budget Management
It aggregates the expense amount by item for the specified year and month. It allows you to view the difference between budgeted and actual expenditures in the data bar, so you can quickly grasp how much you are spending against the budget. As actual expenses increase, the data bar becomes smaller.
F Budget
Enter your monthly budget for each expense item.
G Summary
It displays the monthly total of income, expenses, and balance for the specified year and month in a list. The large font makes it extremely easy to read.
H Trend Tracking
The tool aggregates income, expenses, and balances for the specified year on a monthly basis, displaying them in a yearly graph. The aggregated values appear as bar charts and line charts, allowing you to track patterns and changes over time.
CONTENTS